So, I teach Shakespeare for Kids classes all over the place, and most venues I teach at do not come with stages. I’ve performed in gyms, dance rooms, dojos, boyscout meeting areas, and classrooms. One thing is consistent, I need a place for the actors to go “off-stage”. That is why I created easy-to-assemble sides, built to travel and make an instant performance space!
Below are the simple instructions for the inexpensive and portable sides. Once created, these sides take about 10 minutes to put up and take down, which makes them GREAT for quick performances like Playing With Plays books.
Below are the parts you will need to make ONE side. I use 4, two per side of my “stage” area. You can get all the parts, except the drapes, at a hardware store. The curtains you can find at places like Bed, Bath & Beyond, Target, or Walmart. All in all, each side is no more than $10-15.
- Sharpie (1)
- Zipties (black) (4)
- Drywall screws 1″ (8)
- 1/2″ PVC 90° slip to slip elbows (4)
- 1/2″ PVC 4-way slip-fit Ts (2)
- Black window curtain with loop holes to hang 4′ wide x 6′ long (1)
- 10′ sticks of 1/2″ PVC pipe, schedule 40 (3)
- Drill
- Drill bit – 1/8th inch for pilot holes for screws
- PVC pipe cutter
Steps:
1) Start with (3) 10′ sticks of 1/2 inch PVC pipe. Cut each at 6 feet which will leave you 2 pieces a 6′ and 4′ length. Put 2 of the 6 foot sticks off to the side, those are done and do not need any more work.
2) Take 2 of the 4′ sticks and cut them in half. This will yield (4) 2′ PVC pieces. These are the base stabilizers, put these on the side, those are done and do not need any more work. You should have (1) 6′ piece and (1) 4′ piece left.
3) Cut the 6′ piece down to a 4′ piece. You will now have (2) 4′ pieces and (1) 2′ piece. Discard the 2′ piece, it is no longer needed.
4) TOP CROSS BAR – Take (1) 4′ piece and put (1) 90° elbow on each end. Rotate and push in as far as possible. We are not taking these apart again, so, make sure they are in good and snug.
5) On a flat surface, make sure that the TOP CROSS BAR can sit on the elbows flat on the surface. We need to make sure this is square before we move forward. See figure 1.

Figure 1 – Square up the ends
6) Once the elbows are aligned and square on the TOP CROSS BAR, then turn it over and drill a pilot hole on the inside bend, for our screw. See figure 2.

Figure 2 – pilot hole
7) Screw the 1″ drywall screw into each side. This locks the pole and elbow into place so it can not rotate in the future. See figure 3. (Sides can rotate and fall down if they are not secured by the screw) Put the top cross bar aside, you are done with this piece.

Figure 3 – adding the screw
8) BOTTOM CROSS BAR – Very similar to the top cross bar, but we are including 2 T’s in here. First, take the 4′ stick of PVC and measure and mark 3.5″ and 4.5″ from each end. Cut the PVC at these markings using the PVC pipe cutter. See figures 4 & 5. You should have 5 pieces left: (2) 3.5″ pieces (2) 1″ pieces and (1) 39″ piece. Please note, dimensions will not be perfect, and they don’t need to be, as PVC is flexible.

Figure 4 – measure and cut

Figure 5 – cut
9) Discard the 1″ pieces. Then, assemble the elbow and T’s as seen in figure 6 using the 3.5″ pieces. Be sure to square up and align the 90° elbows AND the T’s. Drill the pilot holes and add the 1″ drywall screws as shown. You should now have 2 pieces assembled that look like figure 6.

Figure 6 – elbow and T assembly
10) Insert the long pipe between the two new pieces we just made. Be sure to square the 90° elbows. Similar to what we did during step 5. Once they are square, drill the pilot holes on both sides. See figure 7.

Figure 7 – bottom bar assembly
11) Add the last 2 screws to the bottom assembly and you have all your pieces done! See figure 8.

Figure 8 – Bottom assembled
12) Now, assemble all the pieces and it should look a little something like figure 9!

Figure 9 – complete assembly
13) I add two holes on both sides of the curtains with a zip-tie in each. It keeps the curtains taunt during the show, as kids ALWAYS want to stick their heads through to see what the audience is doing! See figure 10.

Figure 10 – adding the zipties

Figure 11 – Ziptie locations
14) Now you are ready for a show! Enjoy! Oh, and during the shows, I tape two of the poles together to create one large 8-foot wide panel for the kids to go “back stage”. See figure 12.

Figure 12 – Show time!
Portable Sides for Easy Stage Productions Anywhere! was originally published on Shakespeare for Kids Books
 Okay, this is just a fun post about a book I came across. I can’t speak for it directly, but it looks fun. Shakespeare, Not Stirred. Here’s the excerpt from Amazon:
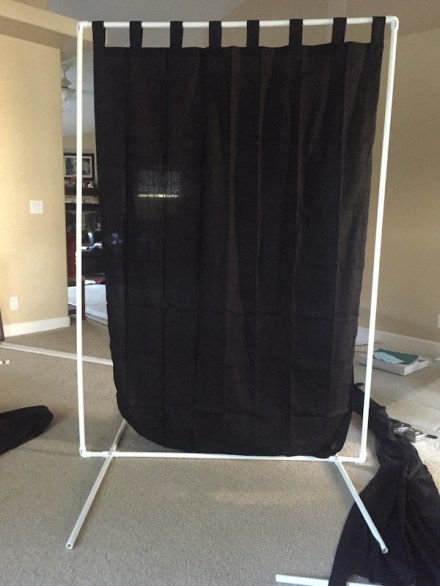

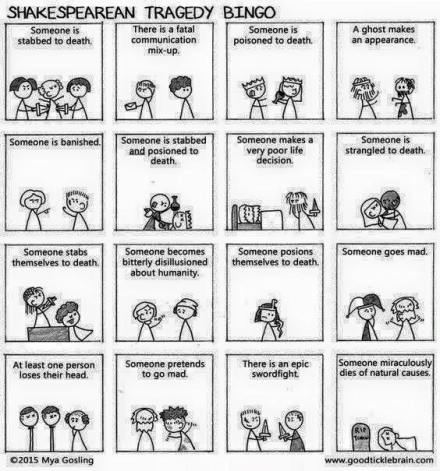
 Ok, let’s start with, I didn’t make this… but, it’s pretty darn cool! (credit to Mya Gosling) Shakespearean Tragedy Bingo. My first thought was, it’s going to be a pretty long game. But, my second thought was to actually make this into a game. Have all the different scenes that relate to the squares put in the “Shakespearean Tragedy Bingo” bag. Pull out the scene and play, review it slightly for a quick learning lesson, and have the kids mark their cards!